

| The 630i Resource Collective: consolidated resources for Dell XPS 630i users |
| (generously hosted by My630i.com) |
All feedback is welcome--please e-mail any suggestions or corrections you may have.
What's new? | Latest news | Issues | File a complaint | Drivers and firmware | Third-party utilities | Manuals
FAQ/Troubleshooting | Overclocking | Installation instructions | Reviews | Mods and recommendations | Links
Master I/O Board firmware | Motherboard BIOS | Display (graphics card) drivers
ESA control software | nForce motherboard drivers | Profiles and settings
New users: Click here for an important note regarding your 630i
It is very important to thoroughly test your 630i to ensure that:
- The Master I/O Board firmware is flashed to the latest version (v.22).
- The ESA control software for fans and LEDs works correctly via the Performance -> Device Settings portion of the Nvidia Control Panel.
- You try out each game and/or application you intend to use, and make sure they run to your liking.
- There are no:
- Blue Screens of Death or crashes.
- RAID or hard drive problems.
- Graphics problems.
- Audio problems with the optional X-Fi audio card (if you ordered one with your system).
- Any other problem or incompatibility that appears to be related to the 630i hardware.
- Lastly, it won't hurt to run a check on your system RAM, using a utility like Memtest86+.
Both new and refurbished 630is from Dell can, and occasionally do, arrive with problems, so it's important to check it all out thoroughly. The reason for this is that you only have 21 days from your Sales Invoice date in which to return your system. If anything doesn't seem right, don't hesitate to (first of all) call Dell and notify them of the problem(s), and then also let us know. Unfortunately, some 630is are just lemons, meaning that no matter how much hardware is repeatedly replaced or swapped out, crashes will still happen. If this describes your situation, and you're still within the 21-day return period (U.S.A.) or the 7-day return period (U.K.) from the date of your Sales Invoice, it is highly recommended that you contact Dell and arrange to have your system returned or get a full monetary refund.
The key difference/benefit in returning a system as opposed to having parts constantly replaced is simply getting rid of a lemon. There have been a number of 630i users (some examples here) whose systems were literally fraught with BSOD or other errors regardless of how many components were replaced...until they got a completely different 630i. Aside from poltergeists, no-one can explain how replacing all the components isn't successful, and a brand-new unit is--but it does work.
For the most part, the order of items on this page is a good guide to upgrade importance of each item listed, with the single-most important item being the latest Master I/O Board firmware version (v.22). If you've thoroughly tested your system, and it seems to work fine, the other items aren't absolutely necessary to upgrade, but may enhance reliability and/or performance. However, Nvidia's latest drivers (display and/or nForce motherboard) aren't always stable or reliable when they're released, so upgrade with caution. Driver versions generally considered to be the most stable will always be listed on the Drivers and firmware page, but experiences do vary from user to user.
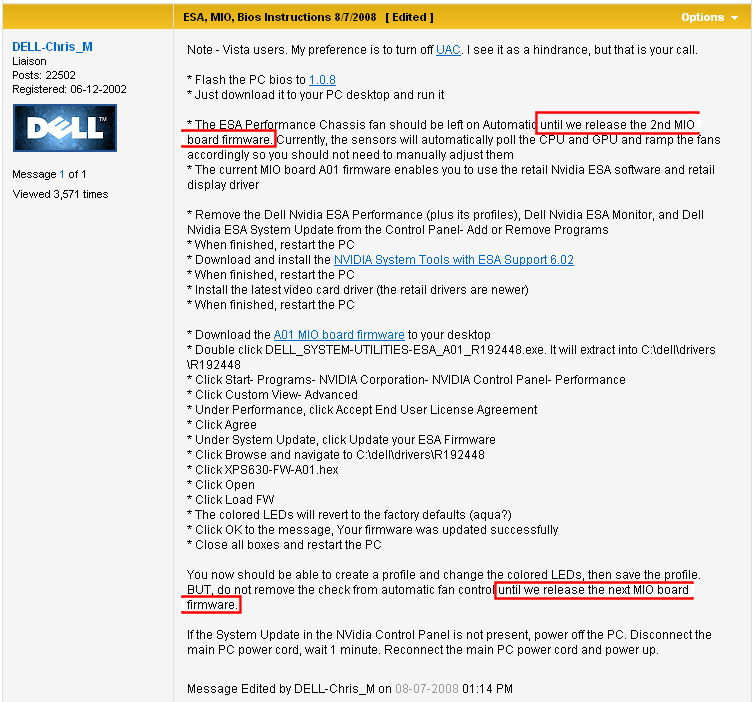
Some of the following instructions are taken from Dell Liaison Chris Mixon's post on the Dell Community Forums. Windows Vista users may want to disable User Account Control (UAC), as it can be a hindrance; but of course that is optional.
Master I/O Board firmware
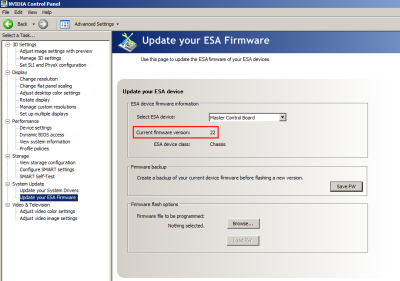
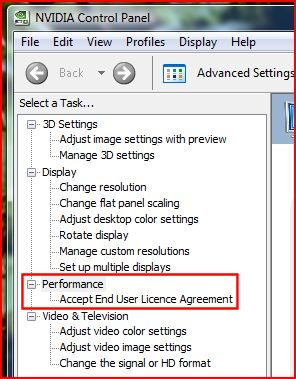
Note: The red rectangular box in the screen shot to the right indicates where you can find your current Master I/O Board firmware version. Following these instructions will install the latest version: 22. If you do not see the "System Update" item in the list on the left-hand side of the window with the two sub-items ("Update your System Drivers" and "Update your ESA Firmware"), you will first need to install the ESA control software.
- Download the latest firmware file below to a location where you can easily retrieve it:
- Extract/unzip the contents (XPS630_MIO_FW_A02.hex) of this zip file to a location where you can easily retrieve it.
- Click Start -> Programs -> NVIDIA Corporation -> NVIDIA Control Panel -> Performance.
- Click View -> Advanced.
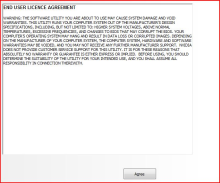
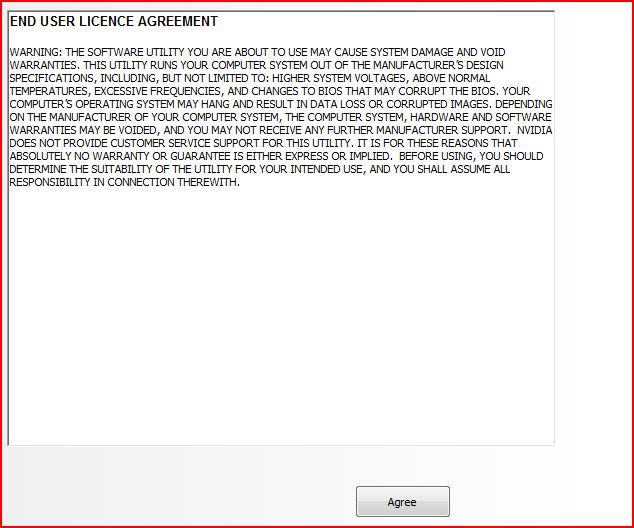
- Under Performance, click Accept End User License Agreement.
- Click Agree.
- Under System Update, click Update your ESA Firmware.
- Browse to the location where you unzipped the XPS630_MIO_FW_A02.hex file and select it.
- Click Open.
- Click Load FW.
- The colored LEDs will revert to the factory default colors (aqua).
- Click OK to the message "Your firmware was updated successfully."
- Close all dialog boxes and restart your PC.
Motherboard BIOS
Note: Before updating the BIOS, you may want to restart and enter the BIOS setup and note or photograph any settings for RAID, hard disk drive, overclocking, and enabled/disabled integrated devices as these will be reset to factory defaults after the update. When you're finished, restart Windows, and follow the instructions below:
- Download the latest BIOS file below to a location where you can easily retrieve it:
- Close all open applications, especially any internet security or anti-virus software you may have running, as these may interfere with the update process. In addition, be sure that you have a reliable power source, as loss of power during this update process may render your system inoperable.
- Double-click the XPS630i-010013a.EXE file in Windows, and click the Continue button in the dialog box that appears:
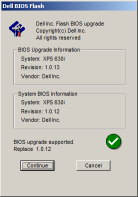
If you encounter a User Account Control error in Windows Vista when doing this, try right-clicking on the XPS630i-010013a.EXE file/icon wherever you've saved it, select Run as Administrator from the pop-up menu, and click on Continue when the security warning(s) appear. Click OK to the following dialog box that opens asking you for confirmation to proceed with the update:

The following text will appear as the BIOS is updated:
Copyright 1985-1988 Phoenix Technologies Ltd.
Copyright 1990-2007 Dell Inc.
All Rights Reserved

Dell System XPS 630i
BIOS version  1.0.13
www.dell.com

Attempting BIOS update, please wait...
- When finished with the update, your 630i should then automatically restart, and boot up with 1.0.13 installed (it may appear to boot twice, but this is normal after the update process).
Update release notes for the 630i BIOS are available here.
Display (graphics card) drivers
Start by selecting the link below that matches your graphics card configuration:
Follow these instructions if you have one or more Nvidia graphics cards installed in your system
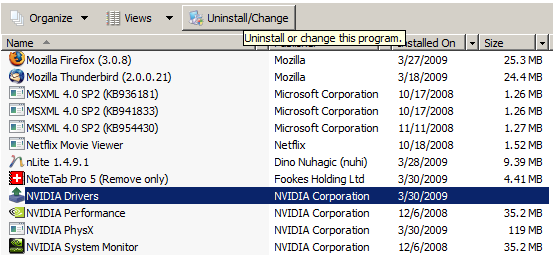
- Uninstall any existing drivers before installing new ones by clicking Start -> Settings -> Control Panel -> Add or Remove Programs (XP) or Programs and Features (Vista).
- Select NVIDIA Drivers and click Remove (XP) or Uninstall/Change (Vista, shown below).
- The following dialog box will open, requesting specific Nvidia driver(s) to remove.
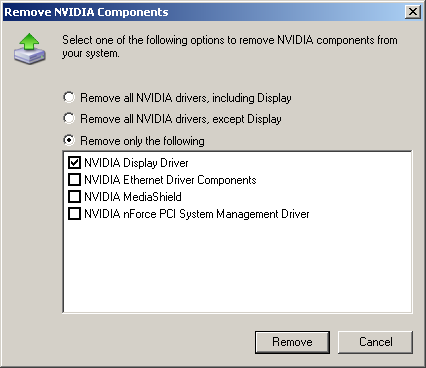
- Select the option Remove only the following.
- Select the checkbox next to NVIDIA Display Driver.
- Click Remove.
- When the uninstall is complete, download the latest driver from the link below:
To do this, change the drop-down box options on the NVIDIA Driver Downloads page to:
Product Type: select your graphics card series name, (e.g. "GeForce")
Product Series: select your graphics card series number, (e.g. "GeForce 8 series")
Operating System: select your operating system type, (e.g. "Windows Vista 64-bit")
Language: select your preferred language, (e.g. "English")
- Click the Search button to the lower right.
- Click the checkbox to the left of the "I have read and agree to the terms and conditions of the NVIDIA Software License Agreement" text.
- Click the Download Now button to the right.
- Save the file in a place where you can easily retrieve it.
- Install the driver file you downloaded.
Follow these instructions if you have one or more ATI graphics cards installed in your system
Note: the installation instructions and driver link below include everything needed for single or multiple GPU installations in a CrossFireX configuration.
- Uninstall any existing drivers before installing new ones.
- Download the latest ATI display driver from the link below:
- Install the driver you downloaded.
- Restart Windows.
- If you have dual graphics cards installed, CrossFireX should automatically be enabled when you log back into Windows.
ESA control software
Note: If you overclock your 630i and want to update the ESA control software, you will first need to uninstall the existing ESA control software, then overclock, then install the new ESA control software. The reason for this is that the ESA control software takes a snapshot of your system after it boots, so when you go into the BIOS and make changes for your overclocking, ESA is not active, therefore when you bootup into the desktop, ESA puts everything you've done back to its snapshot.
- Uninstall any existing drivers before installing new ones.
- Download the following Nvidia ESA Support software (Dell currently recommends that you use Nvidia's ESA Support software instead of their own). Please note that for Nvidia graphics card users only, usage of this version requires Nvidia GeForce graphics drivers 180.43 or later be installed.
- Click Start -> Settings -> Control Panel -> Add or Remove Programs (XP) or Programs and Features (Vista) and if the following three entries exist, uninstall them before installing the new NVIDIA System Tools with ESA Support. Note that when uninstalling NVIDIA Performance, be sure to remove all profiles if prompted.

- Close the Control Panel.
- Open the location where you saved the file.
- Double-click the file and follow the prompts to complete installation. Note that, depending on which components you select to have installed, up to three separate installations may take place automatically (one right after the other)--one each for NVIDIA Performance, NVIDIA System Monitor, and NVIDIA System Update.

Step 1 |
Step 2 |
Performance
section appears |
After installation, you will need to enable the Performance controls and settings by accepting the Nvidia End User License Agreement.
- To do this, first run the Nvidia Control Panel. In the list of items on the left-hand side, you'll see a "Performance" item with "Accept End User License Agreement" directly beneath it (Step 1 at right).
- Select the "Accept End User License Agreement", and click "Agree" on the button at the bottom of the window that appears (Step 2 at right).
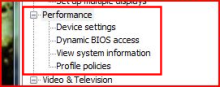
This will then permanently add the four control and settings items to the list: Device settings, Dynamic BIOS access, View system information, and Profile policies (Performance section appears at right). Note that you will need to repeat this step if you uninstall and reinstall the software.
nForce (motherboard) drivers
- Uninstall any existing drivers before installing new ones (ATI graphics card users should uninstall the "Nvidia Ethernet Driver" before installing these drivers).
- Download the latest driver from the link below (the actual file varies depending on which version of Windows you're running):
- To do this, change the drop-down box options on the NVIDIA Driver Downloads page to:
Product Type -> nForce
Product Series -> nForce 6 series
Product -> nForce 650i SLI
Download Type -> Driver
Operating System: -> your operating system type
Language: -> your preferred language
- Click the Search button to the lower right.
- Click the checkbox to the left of the "I have read and agree to the terms and conditions of the NVIDIA Software License Agreement" text.
- Click the Download Now button to the right.
- Save the file in a place where you can easily retrieve it.
- Click Start -> Settings -> Control Panel -> Add or Remove Programs (XP) or Programs and Features (Vista).
- Select NVIDIA Drivers and click Remove (XP) or Uninstall (Vista).
- A dialog box will appear requesting specific drivers for removal:
ATI graphics card users: you may not see this selection menu, and instead be asked if you wish to uninstall the Nvidia Ethernet Driver. If this is the case for you, simply run the nForce installation application without uninstalling the other drivers first. During the installation, it should notify you that an existing driver set was found and is being uninstalled.
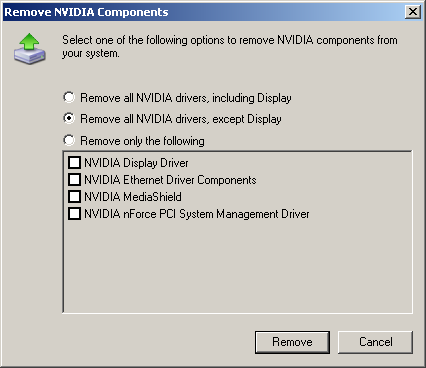
- Select Remove all NVIDIA drivers, except Display, and click Remove.
- When the uninstall process has removed the drivers (which may include an automatic restart of Windows), install the nForce driver you just downloaded by double-clicking the executable file and following the prompts. Please note that you only need to install the NVIDIA MediaShield drivers if you have a dual-hard drive RAID configuration.
Profiles and settings
Note: Profiles may or may not work for you--some users report success with them, others still have problems, despite using the latest available software and firmware. Sometime in mid-late 2008, Dell Liaison Chris Mixon made reference to new ESA software that would resolve the issue of fans not reporting their correct speed when set manually. On August 7, 2008, he referred to a second Master I/O Board firmware update (i.e. newer than v.22) which would address faulty profiles. However, until these updates are released, they remain vaporware.
Setting purple-colored LEDs
- Click Start -> Programs -> NVIDIA Corporation -> NVIDIA Control Panel -> Performance.
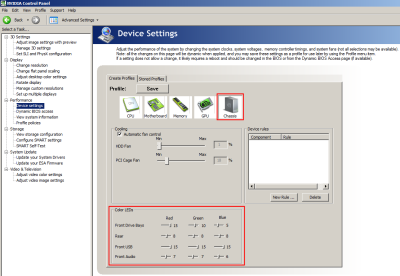
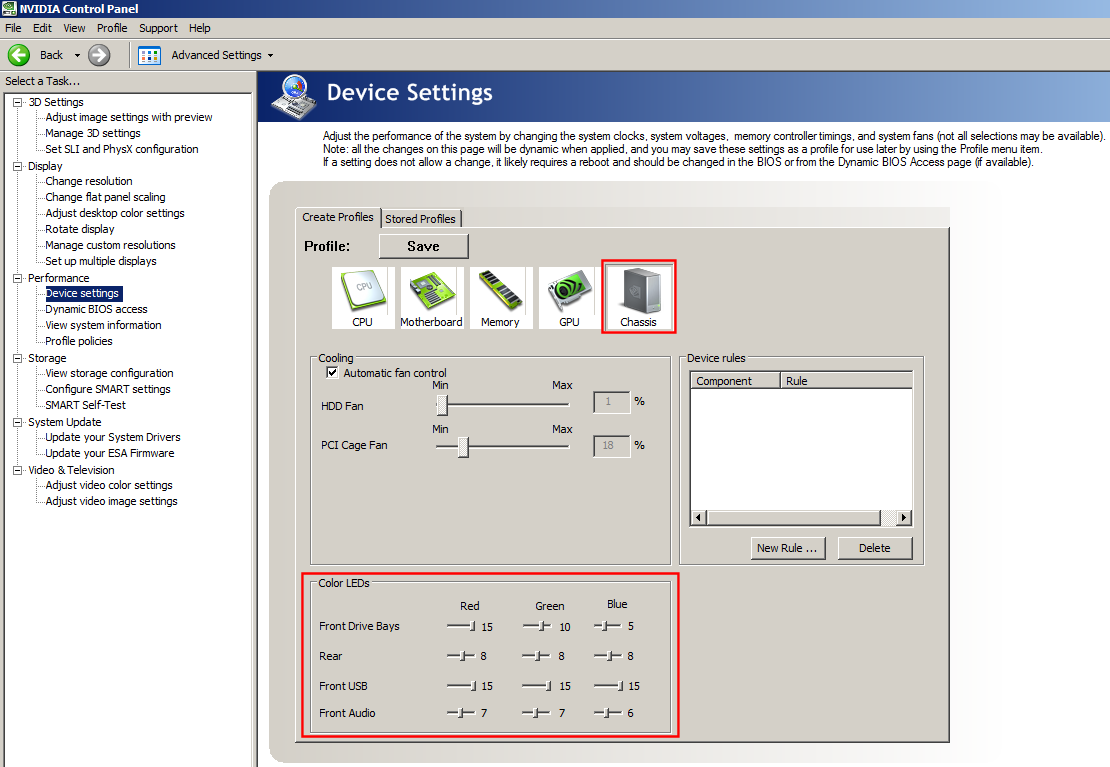
- Under Performance, click Device Settings.
- Click the Chassis icon.
- Leave the check on Automatic fan control. Suggested default settings are HDD Fan = 33%, PCI Cage Fan = 44%.
- To set your color LEDs to purple, adjust the following sliders to:
Red = 15
Green = 0
Blue = 9
- Click Apply. They all turned purple.
- At the top of the NVIDIA Control Panel, click Profile -> Save.
- Save as purple.nsu.
- Click Save.
- Under Performance, click Profile policies.
- In the top window, check Load this Profile.
- In the left box, click The system first starts Windows.
- Click the Right Arrow button.
- In the right box, click the word Profile.
- Click purple.nsu.
- Click Open.
- Click Accept.
- Click File -> Exit.
- Restart your PC. The purple color profile should load automatically.
Setting higher fan speeds for gaming
- Click Start -> Programs -> NVIDIA Corporation -> NVIDIA Control Panel -> Performance.
- Under Performance, click Device Settings.
- Click the Chassis icon.
- Remove the check from Automatic fan control.
- Move both sliders to 55%.
- Click Apply.
- The fans will speed up to 55% but the numbers will NOT represent this (the new ESA software will correct this). But, they are at 55%--you can hear that they are louder.
- At the top of the NVIDIA Control Panel, click Profile -> Save.
- Save as fan55.nsu.
- Click Save.
- Under Performance, click Profile policies.
- In the top window, check Load this Profile.
- In the left box, click Game is loaded.
- Click the Right Arrow button.
- In the right box, click the word Game.
- Click Add Game.
- Add the game description (e.g. City of Heroes).
- Right of Game Executable, click the box with three dots.
- Navigate to the game executable file (e.g. CityOfHeroes.exe).
- Click Open.
- Click OK.
- Click OK a second time.
- In the right box, click the word Profile.
- Click fan55.nsu.
- Click Open.
- Click Accept.
- Click File -> Exit.
- Restart your PC.
Dell Liaison Chris Mixon adds that:
- On restart, my fans backed down to defaults 33% and 44% since I did not have the game started. I started the game, and they ramped back up to 55% although the numbers did not say so. Again, we will fix this in the new ESA software. I backed out of the game and restarted the PC. The fans went back down to the 33% and 44% defaults.
- The ESA Performance Chassis fan should be left on Automatic until we release the second Master I/O Board firmware. Currently, the sensors will automatically poll the CPU and GPU and ramp the fans accordingly, so you should not need to manually adjust them.
- The current [edit: but not the latest] A01 Master I/O Board firmware enables you to use the retail Nvidia ESA software and retail display driver.


